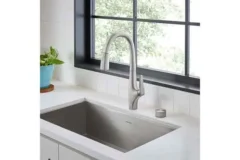
Why is a frostproof faucet so important? A frostproof faucet is a good selection. It is helpful in environments with freezing winter conditions. Yet, its plan stops the water from remaining in the faucet near the external wall. On the outer wall, it can freeze and break the faucet body. The frostproof faucet components need replacement, wear out, or repair.

What is the difference between a Frostproof Faucet and a Standard Faucet?
The significant difference between the frostproof and regular faucets is the stem length. Yet, this faucet has a long stem with a seal at the end. This shank ends inside the home. It holds the tube linelines far off the outlet, yet hot. Thus, the water is not blocked and does not freeze at the stopper. Yet, it also helps to prevent the straight connection of water with the air. Direct contact might cause corrosion faster. But the standard faucet has a firm stem tube. The water remains below the home’s exterior in cool temperatures.
Dimensions of Frostproof Faucet
| Size | L | H | D |
| 4 inches | 2.72 | 8.20 | 2.13 |
| 6 inches | 2.72 | 10.24 | 2.13 |
| 8 inches | 2.72 | 12.14 | 2.13 |
| 10 inches | 2.72 | 16.08 | 2.13 |
How to Install a Frostproof Faucet?
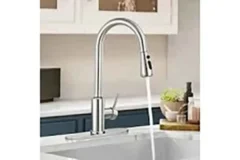
The surest method for keeping an external fixture from freezing is to substitute a regular fixture with a frostproof one known as a sillcock. These fixtures are held with a large pole reaching the home. Yet, the compression valve or cartridge keeps the stream of water. Since the valve itself is situated inside the protected warmth of the house, it is difficult for it to freeze.
This faucet is a 6-to-20-inch unit with a hose faucet. Yet, it controls the handle toward one side. The connector is on the opposite end of the pipe to join the inner water pipe. As a safety standard, these fixtures are intended to be self-draining. Yet, when you shut off the spigot handle, any remaining water in the long stem will drain out of the pipe.
From Elite Earthworks LLC
- These fixtures join to the plumbing pipe with a
- soldered
- PEX
- Push-fit connection
- Compression.
For most individuals, it’s best to buy a fixture with a push-connector style. The SharkBite brand, for example, is the simplest to install. It requires no patching and can be used with a water supply pipe.
You probably have difficulty finding a frostproof fixture with a push-fit connector, but you can use a standard thread type. Apply a female thread to the push-fit change fixing to attach it to the water pipe. If you have PEX tubing in your home, there is also a frostproof faucet, but it is set with PEX-type connectors.

Turn off and drain the water from the supply tube.
Shut off and drain the Water that leads to the external faucet. Yet, if the water tube does not have a control valve, all houses’ water supply should be turned off. To close the water valve, use the home’s main valve. Open the external faucet. Yet, drain out the remaining water from the main supply tube. To eliminate the shallow spigot stream, initiate by eliminating any mounting screw. Turn the spout counterclockwise to unfasten it from the pipe’s enpipe. You must apply several drain lock pliers to twist the spigot stream. Buy a new frost-free faucet of equal size. The diameter and length of the tube must match the previous fixture.
Due to the long valve stem on the frostproof fixture, removing the water supply pipe is generally essential. The fixture’s interface with it. Apply a PEX tubing cutter for PEX pipe, a tubing cutter (for copper pipe), and a hacksaw (for PVC pipe or galvanized steel). End and discard the cut-off segment of the line leading to the home’s exthome’s
1. Prepare the Water Supply Pipe
Debur is within the exterior of the cut end of the water supply pipe, using emery cloth or sandpaper. Ensure the outer line is smooth, clean, and soft. So it can acknowledge the links fitting on the new frostproof spigot. Mark the end of the line at the move in the distance mentioned by the producers. It is generally around 1 inch from the cut finish of the line.
2. Attach the Frostproof Faucet
Install the frostproof spigot through the wall from the outside. Position the spout so it is straight up. Push the inner and drive the fixture straight onto the line. It is trying to determine how much the fitting will cost. It should arrive at the push-in mark on the line. This indicates that the tube is completely inserted into the fitting.
When you use a regular thread-type spigot, screw on the push-fit transition fitting, yet it can be connected to the fixture’s pipe before connecting it to the water pipe. From an external perspective of the house, secure the spigot spine to the wall surface. It does with the help of rusting-safe screws, which are included with the fixture.
3. Test the Faucet
Open the valve on the fixture, then rotate the shutoff valve. It permits water to run out of the fixture. Open and close the fixture faucet sometimes to confirm that it is working. There is no leakage where the spigot tube links with the water pipe. Once the spigot is filled, seal the joint between the fixture. Yet, the house wall has exterior caulk.

How to Protect the Frostproof Faucet?
Fitting the new frostproof fixture will protect your property and allow you to breathe easily in cold temperatures. The fixture does need to be saved for a long time after the fitting. However, you can determine if it works best by applying these steps.
- Tighten the valve till the water stream is closed.
An overtightened valve puts extra pressure on the seals inside the sillcock, which leads to leakage and deterioration.
- Detach your garden hose.
Yet, the area of fitting a frostproof faucet to prevent water from freezing in the outer part of the faucet. An attached hose, which is full of water, holds the tube. The tap is full of water, which reduces the chance of bursting and freezing.
How Does the Frostproof Faucet Work?
This faucet is deep-seated. The water shutoff valve is not present in a regular tap. Yet, the old-style faucet has a valve that tends to freeze. Yet, they found the exterior of the house. The frostproof frameworks house the valve more up the pipe. The anti-siphon assembly or vacuum stops water from the hose from back into the line. It also prevents the water from entering your home’s water supply. Homeowners are unaware of the benefits of buying an anti-siphon assembly faucet. This faucet is available in various lengths to enhance the house. Yet, even if you do not have this faucet, you still need to fix the shutoff valve inside the home.
At the same time, the tap will perform its function without a close-off. The shutoff valve offers one more restriction in winter conditions. However, building it to alter the faucet will become defective in the coming days. Without the support of a shutoff valve, you close off the water supply. This would transfer waste material like debris into your work and then turn it back. It would be best if you always had a shutoff valve for all water supplies in the house.
The main thing to remember is to separate your hoses when the weather turns cold. This permits existing water to drain from the line. Existing hose links are a typical reason for outer faucet failure. The newest house worked with these fixes, and some housing codes must. You would carry it up with the contractors when you build another home. Another element you could need, contingent upon your area, is fixing locks on the fixture if you are replacing a spigot. It’s most worth fixing with a vacuum pack.

Frostproof Faucet Design
Frostproof fixtures are designed so that the valve system seals off the water stream. It uncovers 12, 6, and 8 inches inside the house, which may be away from the uncovered outside part of the fixture. In older fixtures, a long valve stem works as an elastic washer. Yet this packs down against a valve seat found well inside the house. It remains too warm even to consider freezing there.
The fixture is designed so that any standing water inside the line channels out when the fixture turns down. With no water in the line, it can’t freeze, expand, or break the fixture. More current plans have a long valve stem and self-draining characteristics. Yet, they apply a valve cartridge rather than an elastic compression washer, like in all indoor sink fixtures.
New Frostproof coordinates a vacuum breaker phenomenon. Yet, it stops siphoning. This is a code prerequisite. Older Frostproof spigots might not have this feature.

Common Causes of Frostproof Faucet Leakages
Like any fixture, a frostproof faucet can leak due to many regular issues. Here are some critical causes of leakage in this case.
Spills Around the Handle Stem
Yet, the packing cord over the handle stems in older fixtures that work with compression washers. It is present underneath the handle’s mounting nut. Thandle’s reasonable issue is if you see a leak around the thread of the handle mounting nut.
- Shut off the water to the fixture, either at an indoor shutoff valve or by switching off water to the whole house.
- Remove the handle of the faucet. This is attached with one screw that holds the handle to the end of the valve stem.
- Unscrew the packaging nut from around the fixture.
- Remove the old filler thread. Cover a few layers of new packing cord (graphite packaging) around the finish of the stem. Spigot remade kits include this packing cord.
- Reassemble the pressing nut and reattach the handle.
- Spilling from Anti-Siphon Fitting
The frostproof spigot can spill from the counter siphon piece of the valve when the fixture has one. This part can go wrong with us, and to fix it, you will need another new siphon to revamp the brand-intended pack for your fixture. Remade kits can be ordered online or bought from a home improvement shop or plumbing supply house.
Since many fixture brands exist, it is wise to call ahead to check whether they take rebuilt packs for your brand. Make sure to shut down the water for maintenance.
If you experience issues finding new parts for a frostproof hose nozzle, replacing the whole fixture is sometimes more straightforward and may be more cost-savvy. Replacing an entire frostproof hydrant isn’t a fledgling undertaking and is best left to experts.
Cartridge or Worn-out Stem Washer
As with inner faucets, the most common reason for spills is a cartridge or worn-out stem washer. The sign of this type of spill is when closing. The handle fails to stop the stream of water, which typically continues to flow or drip in a slow trickle.
The older faucet applies a compression washer at the end of the long valve stem. The repair involves getting to the washer at the end of the stem to change it.
1. Turn off the water to the fixture at an inner shutoff valve or switch off the water to the whole house.
2. Remove the handle from the faucet by eliminating the handle screw.
3. Unscrew the fixture mounting nut and extract the stem from the spigot body.
4. Check and change the O-rings and washer at the end of the fixture stem. A metal screw generally attaches to the washer at the tip of the stem.
5. Reassemble the fixture, turn on the water, and test to ensure it no longer leaks.
New fixtures might use a cartridge mechanism at the valve stem’s end. For these, dismstem’s the fixture similarly. Substitute the cartridge with a precise copy, and reassemble the fixture.